-
16th August 2017, 07:09 PM
#1
Best Judge of mold analysis
I am changing over to glass filled nylon 6/6 from a standard nylon due to a UL analysis for RTI. They are forcing us to change to a UL listed material so that the over all product will comply to their standards. So my problem is that the part is insert molded over a 1/2" copper rod and now i am getting some small non fill areas. I have been working with a mold flow program now and it does not pick up on the actual non fill areas that are happening in reality, so I am interested in knowing if anyone has experience in mold analysis programs and how to use as many "clues" as possible to see if my new mold changes will help to eliminate the non fill areas of the part.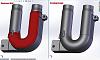 . So if the pictures I have uploaded work they should show changes.
Thanks in advance....
-
21st August 2017, 07:17 PM
#2
Re: Best Judge of mold analysis
Hello Overmolded,
Did the process change when you changed materials or are you running the same saved process? I would expect shorts in this situation as you have changed from a neat material to a glass filled which is going to be stiffer (higher modulus, i.e. harder to inject).
Did you add the insert copper tube in the Moldflow analysis?
I would first recommend running the analysis with the insert. Then I would recommend working on the process.
With regards to the process, I would start by raising your pressure limit to the machine max (turn off pack the first time just in case so you don't flash the tool out). If you are not pressure limiting then you are going to have to work with your melt temp and recovery speeds. Since you have a semi-crystalline material most of the energy needed to melt it is coming from the rear zone of the screw and the screw rotation itself, so a reverse profile might help as well as a fast recovery time. So if your target temp is 600, then your nozzle and two middle zones should be set to 600 and your rear zone should be set at 630. Also, your recovery rotation should be set high to get more shear thinning out of it. The last thing you can try is increasing your fill speed and I know this sounds crazy because you would think the pressures would shoot up but in some cases, a faster fill speed equals more shear thinning which will actually lower your pressures.
The very last thing I would do is start changing steel in the tool. But in some cases, it may be the only option.
Hope this helped and good luck!
Husky
Tags for this Thread
 Posting Permissions
- You may not post new threads
- You may not post replies
- You may not post attachments
- You may not edit your posts
-
Forum Rules


 Reply With Quote